Help with your Fronius SnapINverterFronius Symo, Symo Hybrid, Primo & Eco

Help for the device
- On the inverter display, navigate to “Setup” --> “Wifi Access Point” and confirm the activation.
- Connect your laptop / tablet / smartphone to the now available WLAN network “fronius_2xx.xxxx” (network key: 12345678).
- Enter the following IP address in the address bar of your browser (e.g. Google Chrome): “192.168.250.181”.
- Set the IP switch on the Data- or Hybridmanager of the SnapINverter to position A (small DIP switch by the 4 LEDs).
- Connect your PC / laptop to the SnapINverter (Data- or Hybridmanager) using a network cable (CAT5 or higher).
- Enter the following IP address in the address bar of your browser (e.g. Google Chrome): “169.254.0.180”.
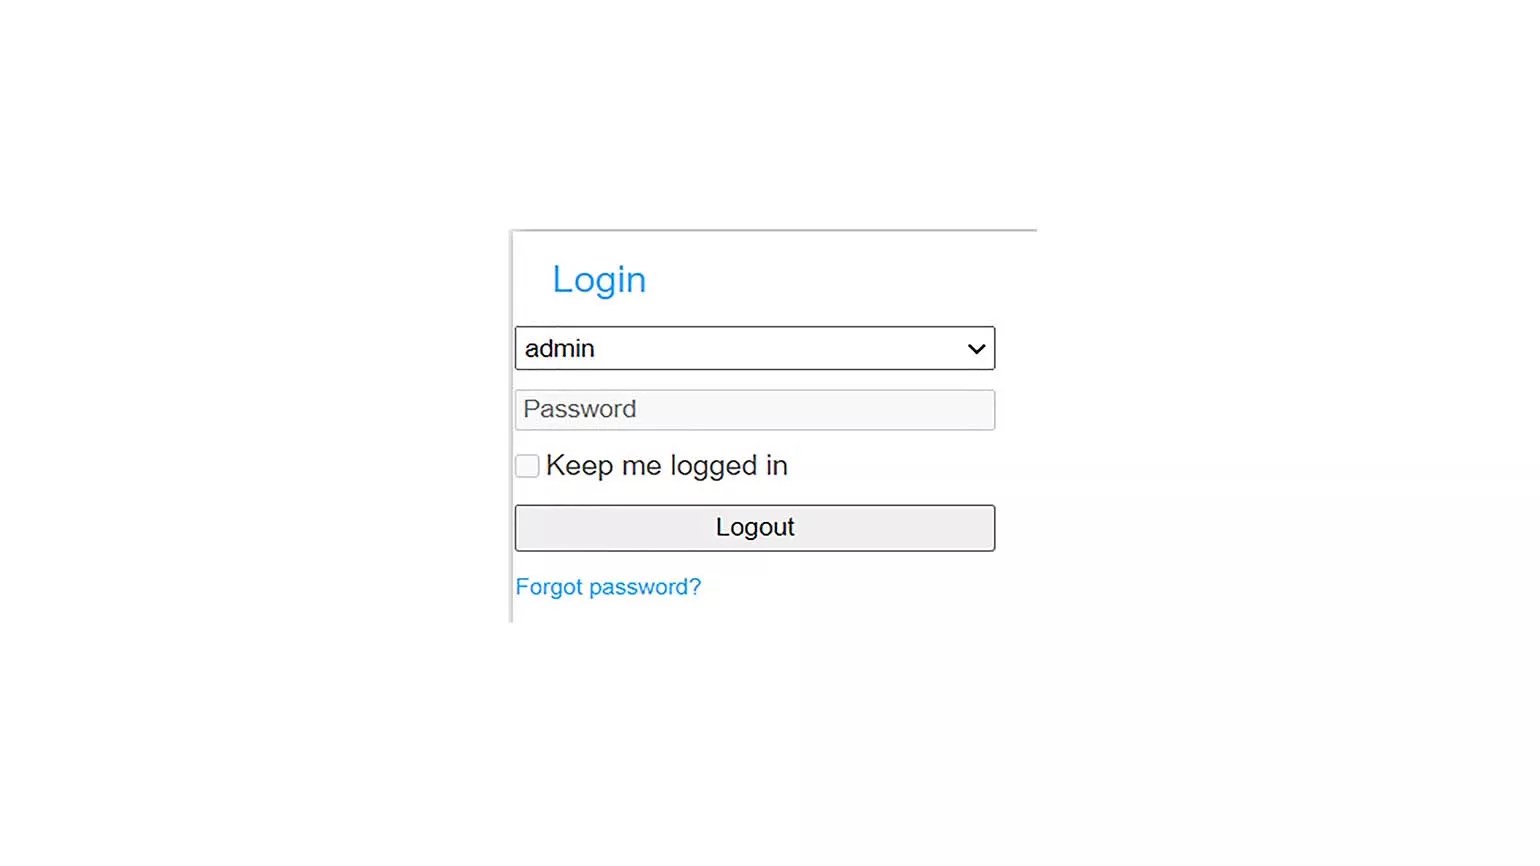
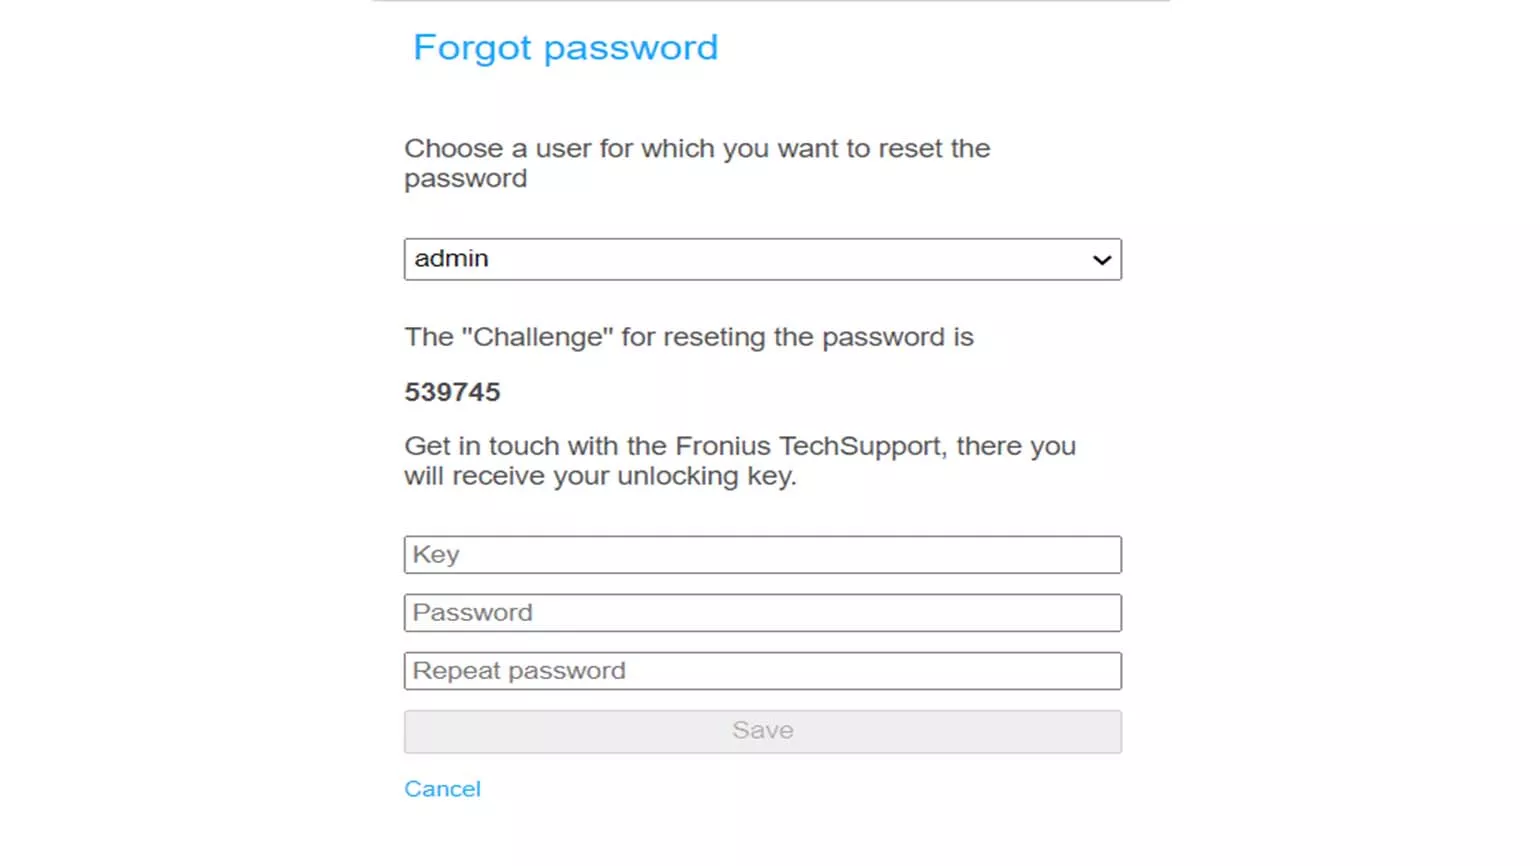
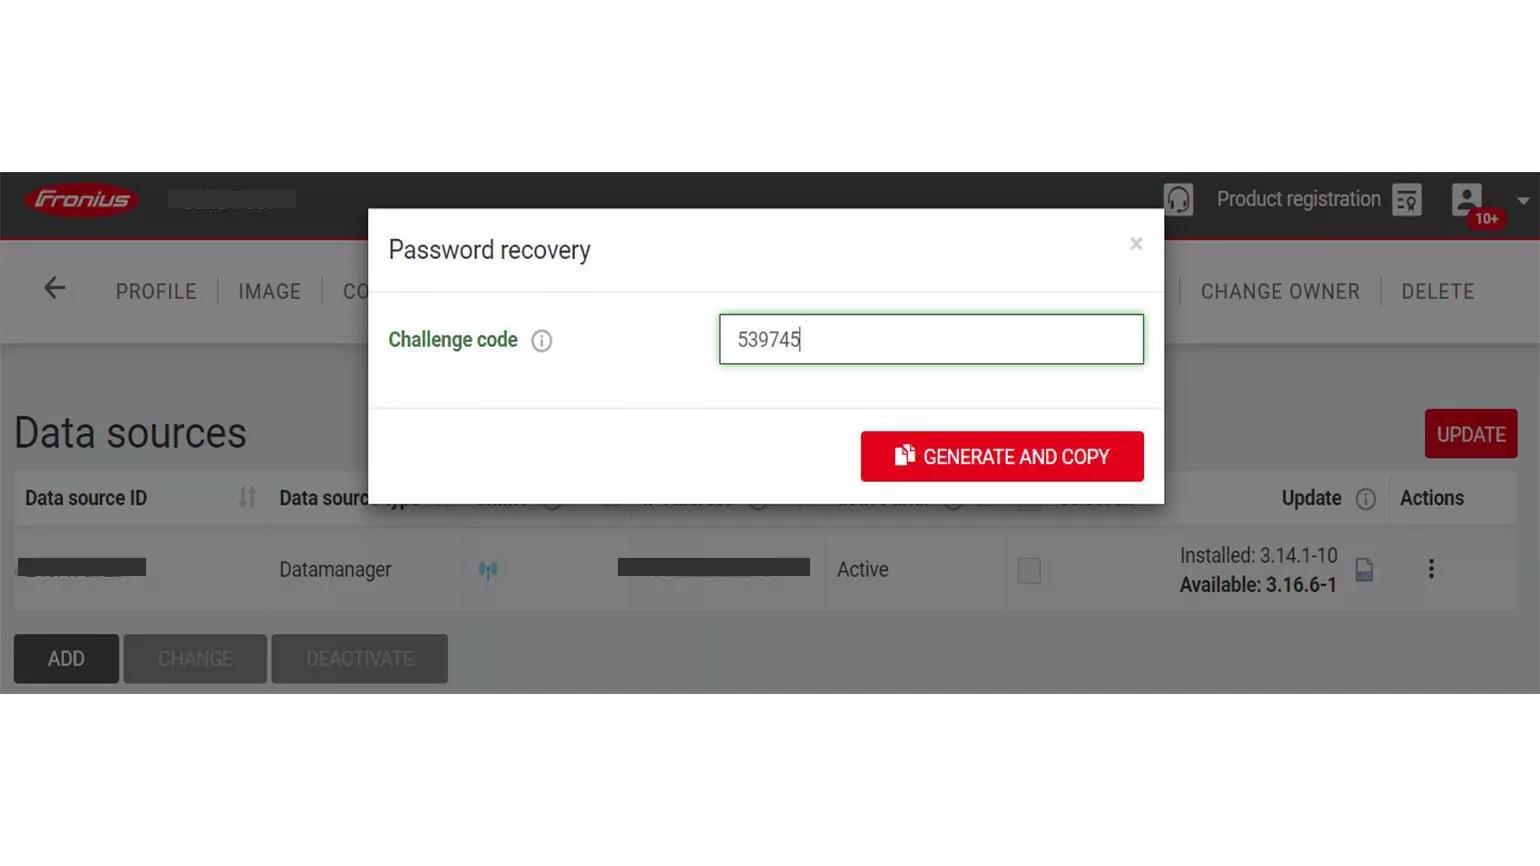
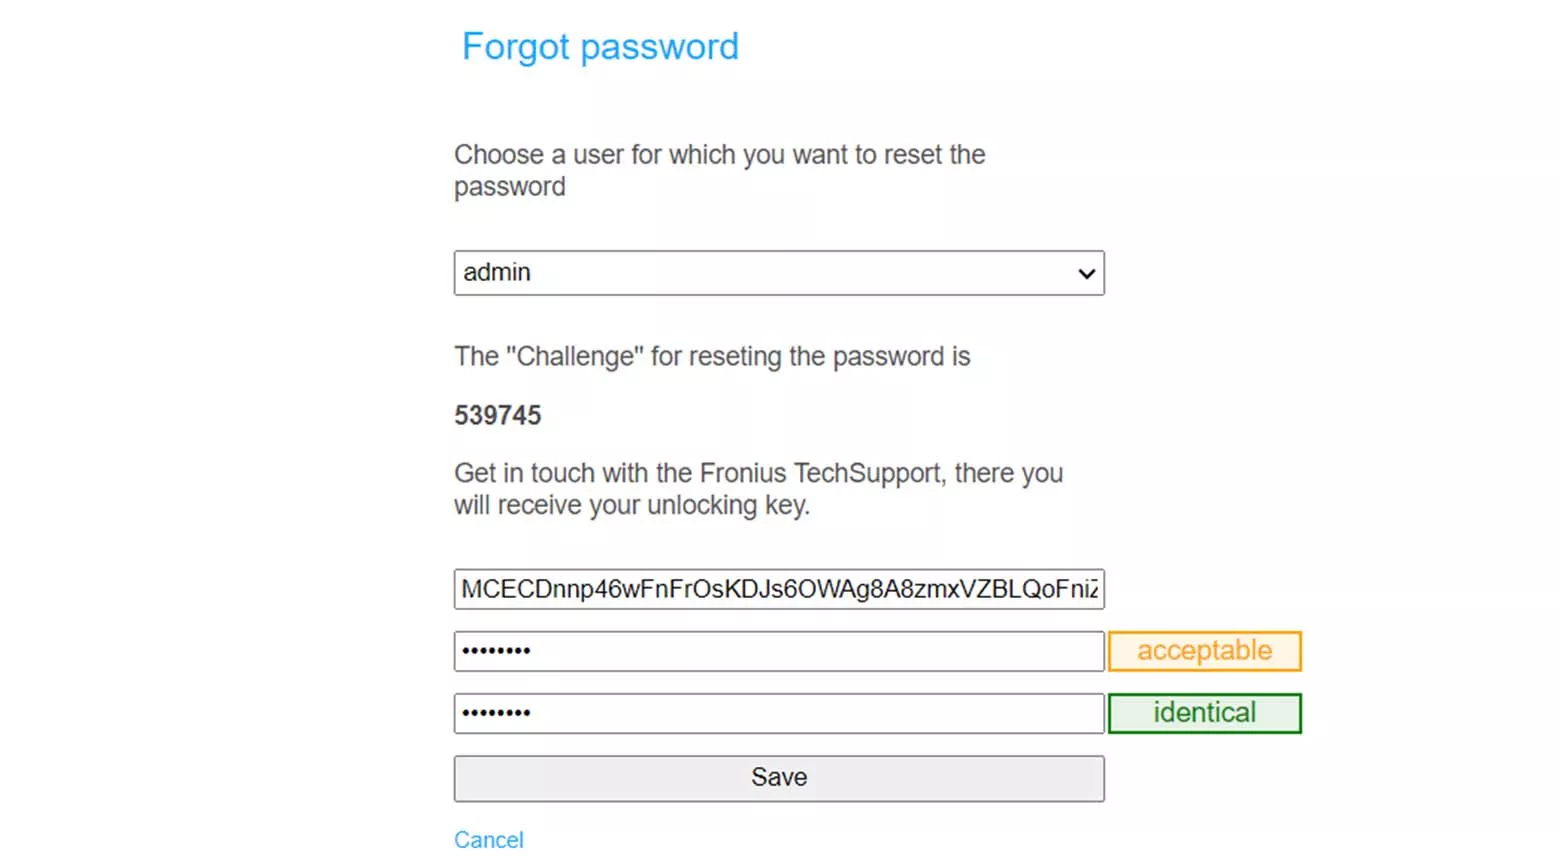
If a password for the local user interface of the SnapINverter has been forgotten, click on “Forgot password?” to generate a pin for the respective user role (“user”, “admin” or “service”). This pin can be used to generate a recovery key through which the respective password can be reset.
To reset the
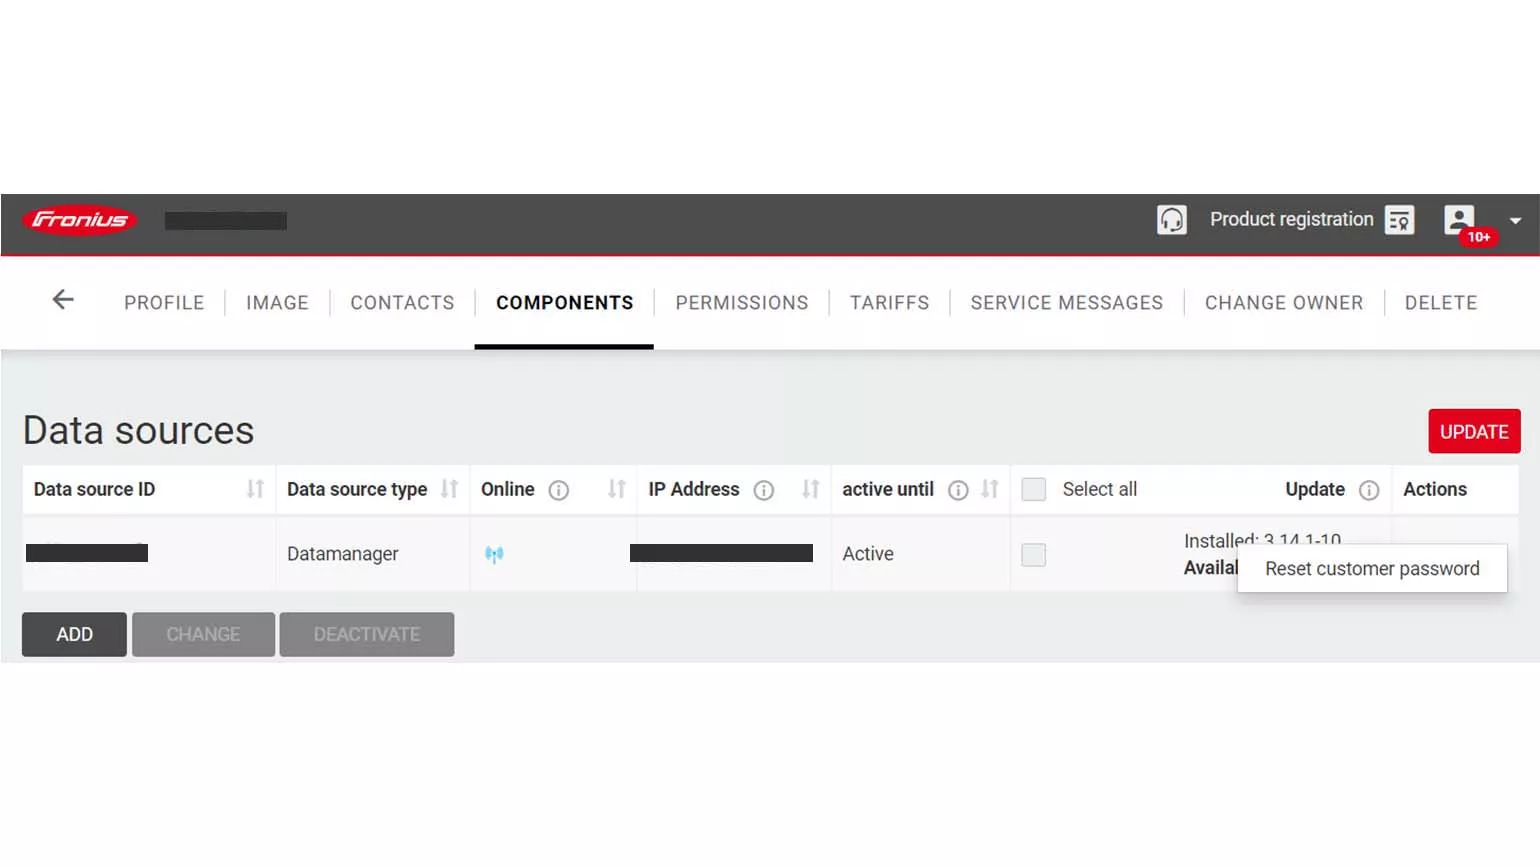
“admin” password, go to your system on Fronius Solar.web with the generated
pin. Go to “Settings” --> “Components”
and click on “Actions” for the data source of the respective inverter. Create
the recovery key for your new “admin” password using the “Reset customer
password” function.
Only the owner of the Solar.web system can use the “Reset customer password”
function. If you do not see the function displayed, you are not set as the
owner of the system. In this case, please contact the installer of your
system.
The "service" password can only be reset using a recovery key created by Fronius TechSupport. Resetting the "service" password is reserved for trained specialist personnel (electrician, system installer, Fronius System Partner). To reset the "service" password, please contact the installer of your system.
Please note that the recovery key is only valid as long as the corresponding pin is displayed on the user interface of the SnapINverter (Data-/Hybridmanager) when you click “Forgot password?“. After restarting the inverter or after entering an incorrect recovery key five times, a new pin is generated. In this case, a new recovery key must also be generated.
Proceed as follows to reconfigure the network, for example after replacing a router, and to establish an Internet connection to the inverter:
- Access the user interface of the device (see: “Accessing the user interface of the SnapINverter via WLAN“ or “Accessing the user interface of the SnapINverter via Ethernet“). To proceed, the setup wizard must have been entirely completed. If the setup wizard opens automatically when you visit the user interface, complete it first.
- On the user interface of the SnapINverter (Data-/Hybridmanager), go to “Settings” --> “Network”.
- Select the desired connection mode “Internet via LAN” or “Internet via WLAN”. For “Internet via LAN”, set the IP address to “static” or “dynamic” under the LAN settings. In most cases, the setting “dynamic” is sufficient. For example in corporate networks, the setting “static” may be mandatory. To set this up, please contact the network administrator of the system. For “Internet via WLAN”, select your home network under “Available networks”. Click on “Set...” and enter the network key of your home network. Click on “Configure WLAN IP” and set the IP address to “static” or “dynamic”. In most cases, the setting “dynamic” is sufficient. For example in corporate networks, the setting “static” may be mandatory. To set this up, please contact the network administrator of the system.
- Click the check mark in the upper right corner to apply the changes.
If the message "not available" is displayed on your Fronius SnapINverter under “Setup” --> “Wifi Access Point”, check the Datcom status. Go to “Setup” --> “Datcom” --> “Datcom Status” and check whether “Status OK”, “Status Error” or “Interface” is displayed.
If the status shows “OK”, but the Wifi Access Point is still not available, your components may not yet support the “Wifi Access Point” function. In this case, try to access the user interface of the device via Ethernet (see: “Accessing the user interface of the SnapiINverter via Ethernet“). If the status shows “Error”, there is a problem with the Solar Net connection. If you have a single inverter installed or use one Datamanager per inverter, make sure that both termination plugs are plugged into the “IN” and “OUT” ports in the Datcom area of the inverter. The Datcom area is located behind the lower, grey cover on the front of the inverter.
If you have connected several inverters via Solar Net (RS422), check their cabling. The connection must always be made from “OUT” to “IN”. On the first and last device, the termination plugs must be plugged in. If the status shows “Interface”, switch it to “Solar Net” under “Setup” --> “Datcom” --> “Protocol Type”.
If you are still unable to connect to the device's user interface, please contact your installer.
Reasons for missing notification in the event of a device failure:
The sending of service messages is deactivated on Fronius Solar.web:
On your system on Solar.web, navigate to “Settings” -->“Service Messages”. Click on “Edit” and check “Receive service messages”. Set the period of time after which you want to receive the service message in the event of an outage. Finally, confirm the settings with “OK”.
No phone number or e-mail address for notifications is set on Fronius Solar.web:
On your system on Solar.web, navigate to “Settings” --> “Contacts” and check under “Telephone” and “E-mail” whether your contact details are set correctly. Telephone: Click on the phone number and on “Edit” to check if the check mark has been set for “Active”. E-mail: Click on your e-mail address and on “Edit” to check if a check mark has been set for “Receive service messages”.
The sending of service messages is deactivated on the user interface of the device:
Access the user interface of the SnapINverter (see: “Accessing the user interface of the SnapINverter via WLAN“ or “Accessing the user interface of the SnapINverter via Ethernet“). Navigate to “Settings” --> “Fronius Solar.web” and activate “Send the service messages to Fronius Solar.web immediately".
Learn what steps can be taken to resolve common issues when accessing the Data- or Hybridmanager's user interface.
Check the connection to the Wifi Access Point
The Wifi Access
Point deactivates itself 1 hour after activation or when changing network
settings.
Some devices also automatically disconnect from the Wifi Access
Point after some time because there is no Internet connection.
If the user
interface of the SnapINverter (Data-/Hybridmanager) cannot be accessed or no
longer responds, make sure your device (laptop / tablet / smartphone) is still
connected to the Wifi Access Point of the inverter. The procedure is described under “Accessing the userinterface of the SnapINverter via WLAN“.
Connect to the Wifi Access Point via network security key (on Windows
10)
Some Windows 10
devices automatically require a pin code when connecting to a new WLAN network.
In
this case, you have the option to enter a network security key instead. If
you want to connect to the Wifi Access Point and are asked for a pin, select
the option to enter the network security key instead. The network key for
the Wifi Access Point is 12345678.
Check the IP address
The IP address when accessing via Wifi Access Point is: 192.168.250.181 The IP address when accessing via Ethernet is: 169.254.0.180 If you access the SnapINverter’s (Data- or Hybridmanager) user interface from your home network, you must use the local IP address that your router has dynamically assigned or that you have set statically yourself.
Clear your browser’s cache and cookies
If you are experiencing problems with the display of the user interface of the SnapINverter (Data-/Hybridmanager) or if a password is requested that has not yet been set, this is often due to the cache memory and/or the cookies that browsers automatically save. In this case, close the user interface, clear your browser’s cache and cookies and then reopen the user interface of the device. Cache and cookies can be cleared in the browser settings. The exact procedure depends on which browser you use.
Restart the inverter
If the user interface of the SnapINverter (Data-/Hybridmanager) got stuck and no longer responds, a restart of the inverter can help. Disconnect the inverter first on the AC side (FI or circuit breaker), then on the DC side (switch on the inverter) and leave it switched off for about 30 seconds. The inverter must be completely dark. No LED may light up anymore. Then turn the AC side and the DC side back on.
Install the latest firmware
Make sure your Data- or Hybridmanager’s firmware is up to date. Here you find more information about firmware updates.
Reset to factory settings
You can reset a Data- or Hybridmanager to factory settings via a reset link. First, connect to the device via WLAN or Ethernet. The procedure is described under “Accessing the userinterface of the SnapINverter via WLAN“ or “Accessing the userinterface of the SnapINverter via Ethernet“. Then enter the following command with the IP address of your device in the command bar of your browser:
Command bar (IP address when accessing via Wifi Access Point): 192.168.250.181/admincgi-bin/configRevert.cgi?scope=all
State Codes Fronius SnapInverter - hardware
ERROR MESSAGES WITH FRONIUS GALVO, PRIMO, SYMO, SYMO HYBRID AND ECO
Does your Fronius inverter show an error code?
First, make sure that your device has the latest firmware version installed. Information about updates can be found here.
In the following error code list you will find explanations and solutions for various problems.
Reasons & solutions:
When the Solar.web wizard is completed on the SnapINverter user interface, a connection to Fronius Solar.web is established and the system checks whether the datalogger ID of this Data-/Hybridmanager is already active in an existing system. If this is the case, error 01-0012 is displayed in the user interface. Reasons for this can be:
- The Solar.web wizard has already been completed and the system has therefore already been automatically created in Solar.web. You should already be able to view the system on Solar.web. If you do not see the system on Solar.web, please contact your installer.
- Your system has already been manually added to Solar.web. Check with your installer to see if this is the case. He can grant your Solar.web user rights for the system or hand over the system to you so that you also have access. Learn more about Solar.web system rights here.
- Someone incorrectly added your system's Datalogger ID to Solar.web. To check, contact our customer support using our contact form.
Reasons & solutions:
The inverter is not producing because no stable AC grid is detected.
Make sure the circuit breaker is switched on.
The status code 107 is also displayed if the grid was only temporarily absent, for example due to a power failure or a shutdown. If the error is permanent, please contact your installer.
Reasons & solutions:
Arc detection has triggered. If there has been a problem with your PV modules or a storm, this may be the reason for these state codes.
Please contact your installer to check the system.
Reasons & solutions:
Status message 306 is sent by the inverter if there is not enough power available from the PV modules.
This can happen if the PV modules are covered with snow, dirt or leaves or during the night hours. If the PV modules are clear, make sure that the DC switch at the bottom of the inverter is in the “I” switch position (on).
Reasons & solutions:
Status code 307 is sent by the inverter if there is not enough voltage available from the PV modules.
This can happen if the PV modules are covered with snow, dirt or leaves or during the night hours. If the PV modules are clear, make sure that the DC switch at the bottom of the inverter is in the “I” switch position (on).
Reasons & solutions:
During its automatic insulation measurement, the inverter detected too low a resistance on the DC side.
There may be a problem with the PV modules or their cabling. Often the error occurs only under certain conditions, such as rain.
Please contact your installer to check the system.
Reasons & solutions:
Status code 509 is sent by the inverter if there is not enough power available from the PV modules for a period of 24 hours.
This can happen if the PV modules are covered with snow, dirt or leaves or during the night hours. If the PV modules are clear, make sure that the DC switch at the bottom of the inverter is in the “I” switch position (on). the PV modules are clear, make sure that the DC switch at the bottom of the inverter is in the “I” switch position (on).
Reasons & solutions:
Status code 522 is sent by the inverter if the voltage from the PV modules is too low to start operation.
This can happen if the PV modules are covered with snow, dirt or leaves or during the night hours. If the PV modules are clear, make sure that the DC switch at the bottom of the inverter is in the “I” switch position (on).
Reasons & solutions:
Status code 523 is sent by the inverter if the voltage from the PV modules at input “DC2” (MPPT2) is too low to start operation.
This can happen if the PV modules are covered with snow, dirt or leaves or during the night hours.If the PV modules are clear, make sure that the DC switch at the bottom of the inverter is in the “I” switch position (on).Make sure that PV modules are connected to the input “DC2” (MPPT2), which means that this is physically occupied.
In case of doubt, your installer can provide you with information.If the input is not in use, please go to the display of your inverter. There, the input can be deactivated by pressing the 3rd button from the left 5 times and then entering the code “2-2-7-4-2” using the arrow keys and the Enter key. Go to “MPP Tracker 2” -> “DC Tracking Mode” and select “OFF”. If PV modules should be connected, select “AUTO”.
If you are unable to solve the problem yourself, please contact your installer.
Reasons & solutions:
The status message 65000 is sent by the Symo Hybrid if there is no connection between the inverter and the storage system or if it has been interrupted.
First, make sure your Symo Hybrid has the latest firmware installed. Learn here how to update via Solar.web.
Otherwise, reboot the storage system:
- Disconnect the inverter first on the AC side (FI or circuit breaker), then on the DC side (switch on the inverter).
- Turn off the storage.
- Wait about 30 seconds. The inverter must be completely dark. No LED may light up anymore.
- Turn the storage back on.
- When the storage has started up (after about 30 seconds), switch the inverter back on (AC and DC side).
State Codes Fronius SnapINverter - Software updates
When updating the software of your Fronius Galvo, Symo, Symo Hybrid or Eco inverter, an error code is displayed?
Below you will find a list of error messages with a description of how to rectify the problem.
Reasons & solutions:
- The USB flash drive is write or read protected. Disable the write or read protection of the USB flash drive.
- The USB flash drive was not detected. Ensure the USB flash drive is in FAT32 format.
- The USB flash drive is not supported. Please use a different USB flash drive.
- The firmware version is out of date. Make sure that you have loaded the latest firmware version onto the flash drive.
Reasons & solutions:
The USB flash drive is not suitable due to too high current consumption. Use a different USB flash drive.
Reasons & solutions:
The USB flash drive was removed during the software update. Please perform the update again.The software update has been cancelled or has failed. Please perform the update again.
Reasons & solutions:
- The software name is incorrect. Check the software name and correct the designation if necessary. (Correct: Froxxxxx.upd)
- The software was stored in an incorrect directory. Copy the firmware file to an empty USB flash drive
- The USB flash drive is not supported. Use a different USB flash drive.
Reasons & solutions:
- Older or faulty software was detected on the USB flash drive. Save the latest available software to the USB flash drive.
- Software from another inverter series was saved. Download the correct firmware file to the USB flash drive.
- The software does not support at least one of the installed PCBs. Please contact your installer.
Reasons & solutions:
- The USB flash drive has an incorrect file system (NTFS). Ensure the USB flash drive is in FAT32 format.
- The USB flash drive is password-protected. Disable the password prompt.
- The USB flash drive is read or write protected. Disable write and read protection on the USB flash drive.
- The USB flash drive is not supported. Use a different USB flash drive.
Reasons & solutions:
- The software is faulty. Download the latest software to the USB flash drive.
- The USB flash drive has an incorrect file system (NTFS). Ensure the USB flash drive is in FAT32 format.
- The USB flash drive is not supported. Use a different USB flash drive.
Reasons & solutions:
- The USB flash drive is password-protected. Disable the password prompt.
- The USB flash drive is read or write protected. Disable write or read protection on the USB flash drive.
- The USB flash drive has an incorrect file system (NTFS). Ensure the USB flash drive is in FAT32 format.
- The USB flash drive is not supported. Use a different USB flash drive.
Reasons & solutions:
- The USB flash drive has an incorrect file system (NTFS). Ensure the USB flash drive is in FAT32 format.
- The USB flash drive is not supported. Use a different USB flash drive.
Reasons & solutions:
- The storage space on the USB flash drive is occupied. Free up space on the USB flash drive by deleting unnecessary files.
- The memory on the USB flash drive is too small. Use a larger-capacity USB flash drive.
- The USB flash drive was removed during writing. Reconnect the USB flash drive. If the update has been cancelled, restart it.
- The USB flash drive has an incorrect file system (NTFS). Ensure the USB flash drive is in FAT32 format.
- The USB flash drive is not supported. Use a different USB flash drive.


